Recently, I helped a friend design and install his rainwater harvesting system. This was made much easier by my recent experience in Tucson, Arizona. The water harvesting certification from Watershed Management Group was filled to the brim with knowledge, and math. But I digress…
Rainwater Harvesting System:
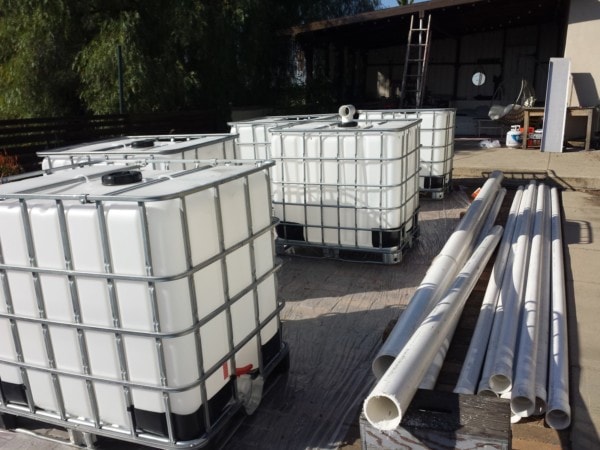
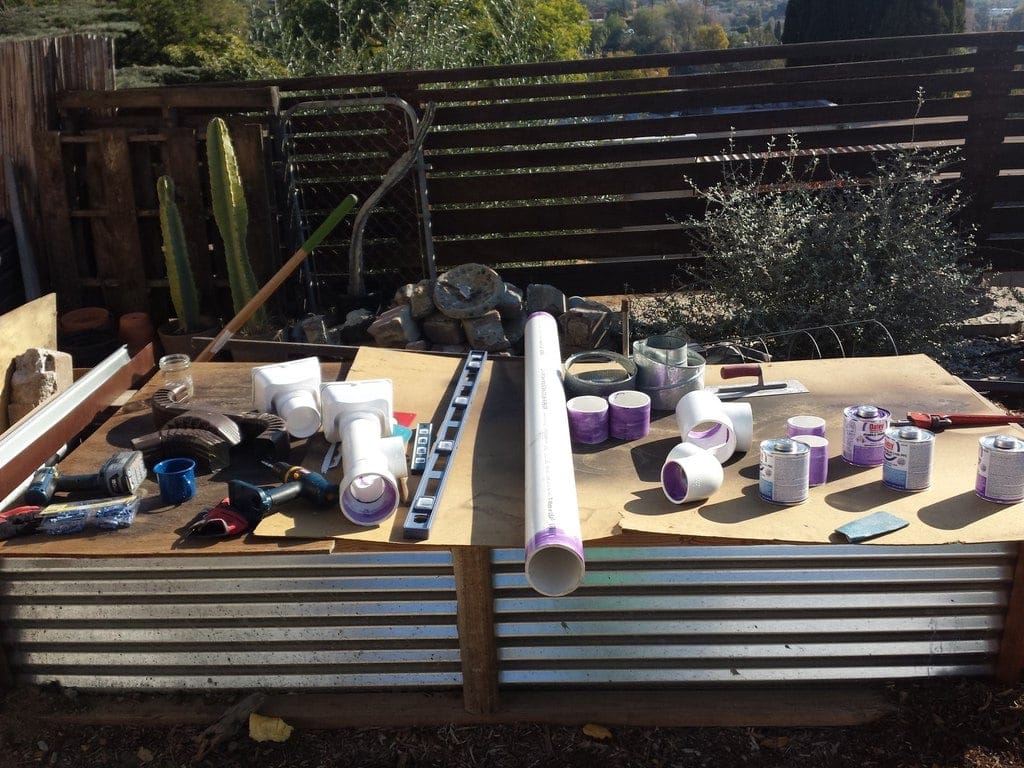
So, my friend Mike contacts me and asks if I would talk rainwater harvesting with him. You can guess what I said, I’m sure. Several hours, beers, and napkins later we came to this. 5 IBC totes (he wanted to use these because of future plans for a deck above) several hundred feel of 3″ PVC pipe, some 4″ PVC, and a 6″ PVC length for building the most awesome first flush ever! More on what a first flush is later…
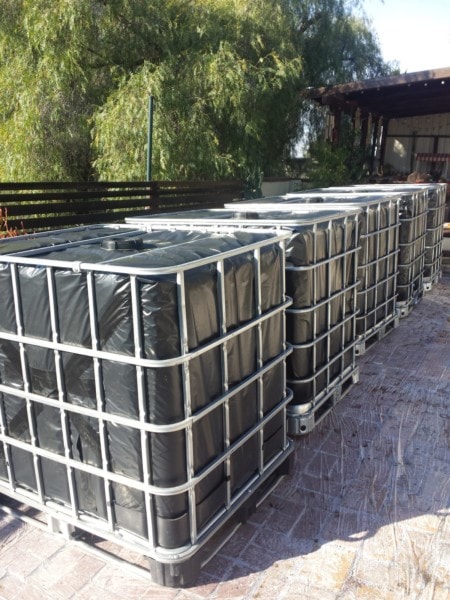
Any container for water, be it, a cistern, rain barrel, or IBC tote, needs to be light proof. Meaning, no light can get into it. This is because if light does get in, you are guaranteed the very unrewarding job of cleaning up algae from the container. With these, we decided to go with 6mm thick plastic. We first removed the IBC totes from the cages and then wrapped them up nice and neatish.
Something to note, if you ever decide to do this, is the need to cut the top tabs that hold the cage to the plastic. Otherwise, no mastery of wrapping will save you.
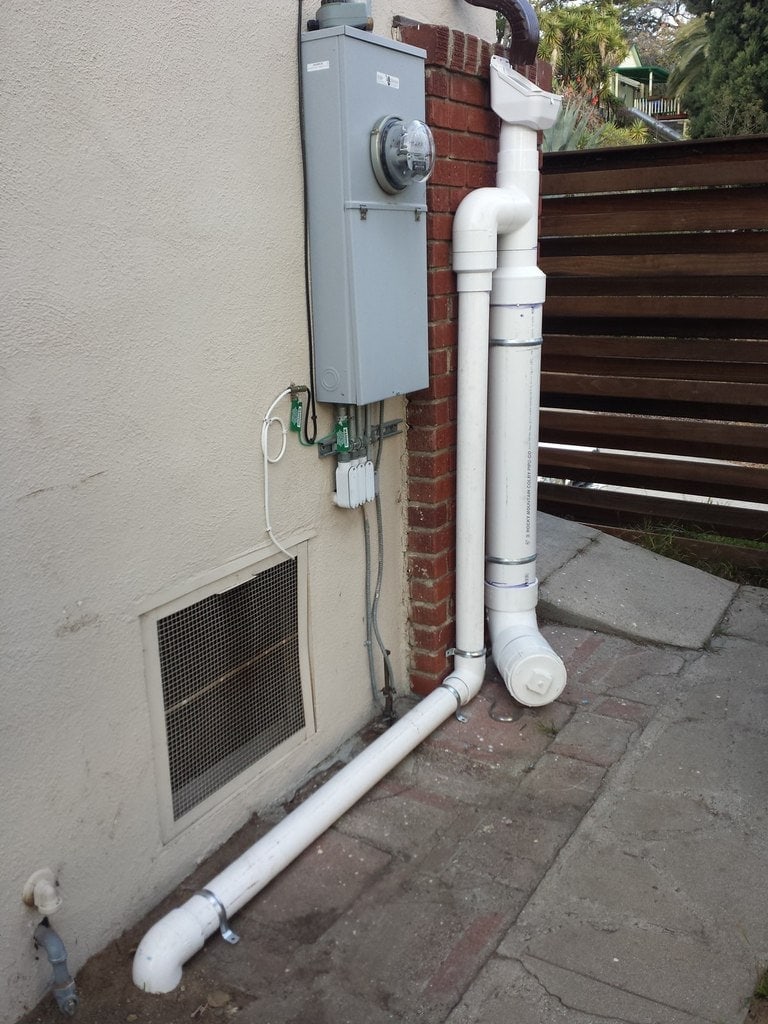

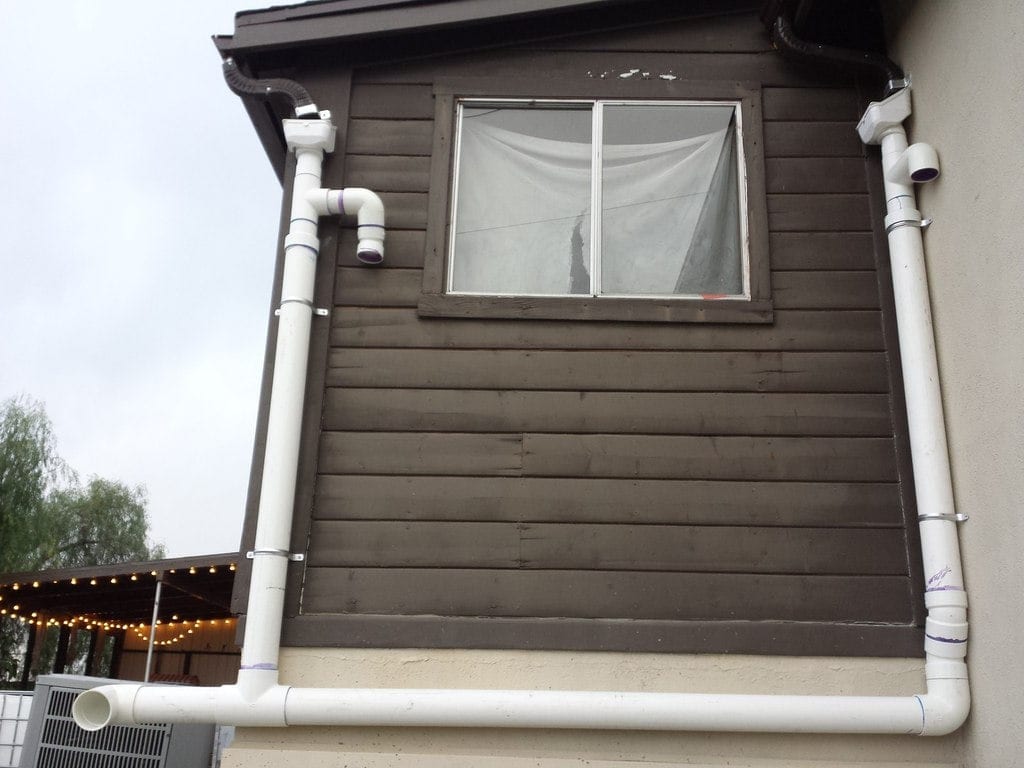
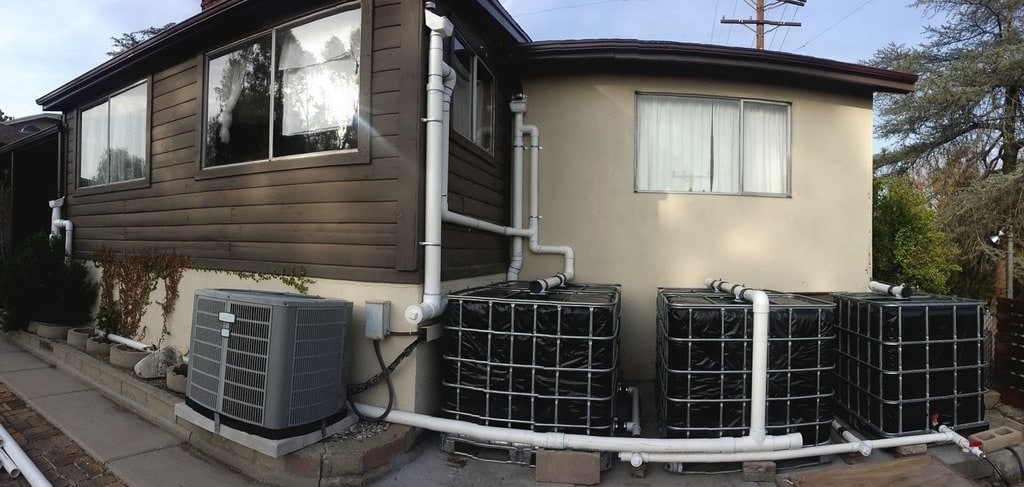
The three photos above are examples of a first flush system. The water from the gutters goes to a Rain Head. This has a mesh that catches most large debris, such as leaves. From there, it goes down to the capped pipes. When these fill up, it then goes to the IBC totes. That is the first flush! Your roof collects a fair amount of contaminants, such as dirt, bird droppings, and such. When it first rains the first flush catches this dirty water and there for “flushes” the roof.
The two images on the left show what a wet system looks like. Basically, the water leaves the first flush and goes into the collection pipe. This, however, is lower than the top of the tanks. What happens is the pipe fills and the water rises up, or levels, on the other side. Permitting it to go into the tank. Not the easiest thing to explain, I know.
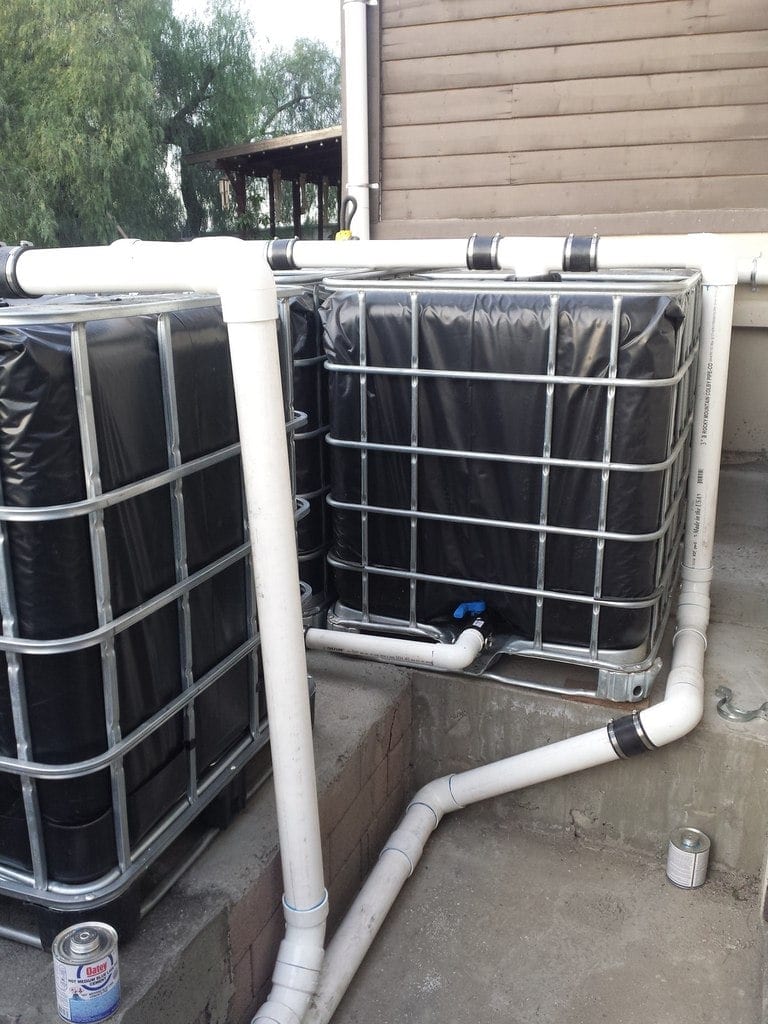
The vertical pipe on the left of the first image, and the vertical one on the right of the second, are the other end of the wet system collection pipes from the previous images.
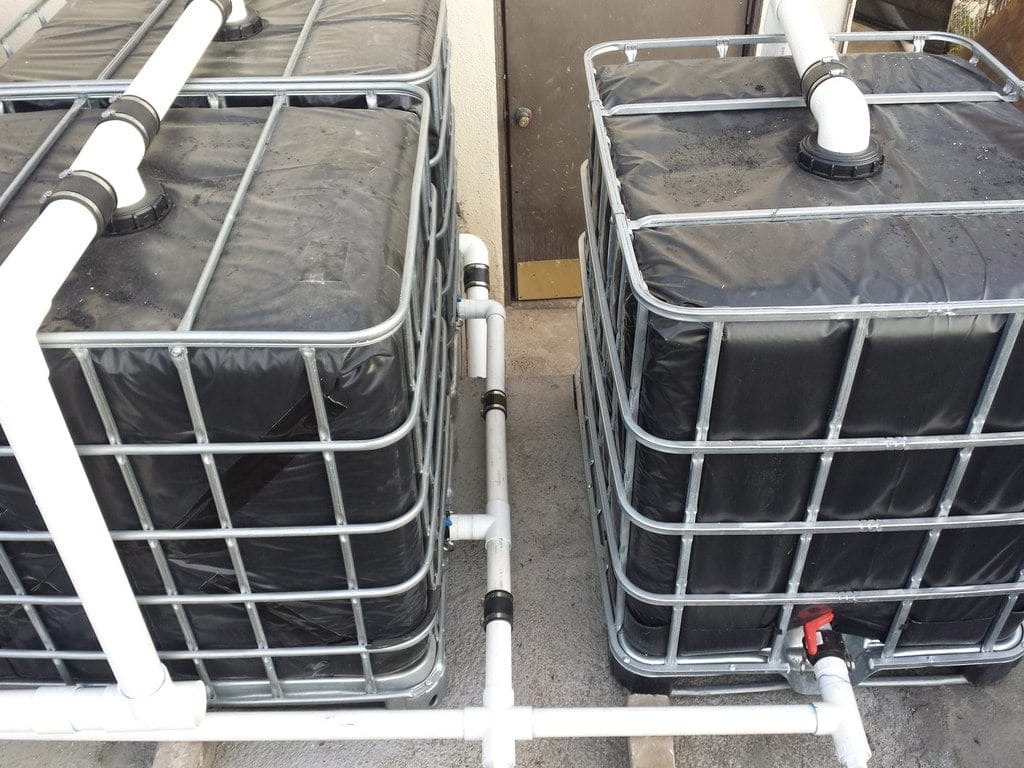
Here, you also see the smaller 2″ pipes that connect all the IBC totes together and where the water will, eventually, be released to the landscape. We decided to use “no hubs”, the black couplers with clamps, so as to be able to detach and service all the parts.
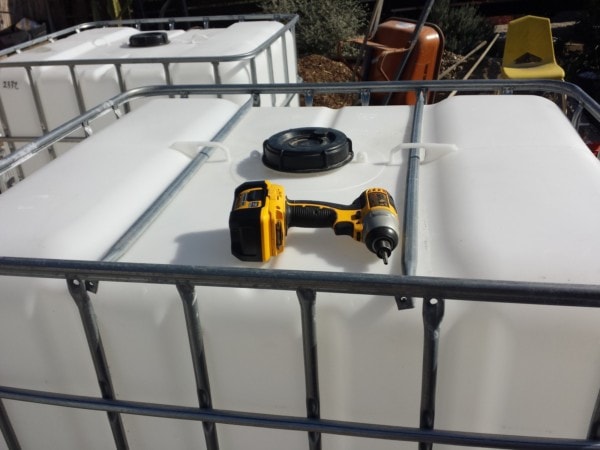
All in all, this was a really fun project and the IBC totes have a total capacity of 1,375 gallons. Which will last this landscape through the dry season and then some.
Till next time…


Hi, loved the article and have a similar system. I want to seal my pvc, where it goes into the tote so that when my totes fill up, over flow will go down the drainage system. Do you have a solution?
Thank you so much!
Cheers,
John
Hi John,
There are many ways to set these kinds of systems up and even more variables that would change the designs. Not knowing how your system is setup, I’m going to make some guesses:
If you don’t get very large downpours in your area, then I would suggest just using the bottom drains as the input, output, and overflow. So you have a 2″ pipe connected to the CamLock fitting going up over the height of the IBC totes, then dropping to your overflow location (drainage).
If you do get heavy rains, then using only the 2″ pipes will backup the flow of water and it will come out where you don’t want. Places such as vents, or your rain heads (if you are using them), or it may even back up all the way to the top of your downspouts. So you would need to use 4″ holes at the top as inputs and overflows in order to be able to capture as much of the rain as possible.
What I don’t recommend, since these are pretty thin plastic, is cutting into them to attach pipes directly to the walls. This works great in more traditional (thicker walled) cisterns. Best to use the CamLock at the bottom or the 4″ cap at the top. They both have their complications and adapters are always needed. Let me know if I understood you correctly and if I can further help! Always happy to talk about sustainable practices…
Hey Sergio,
Found this while searching for information on ibc tote rainwater systems and it explained things really well. In your last photo, is the overflow system visible? I was able to figure out the rest but once the tanks are full I can’t see where the excess would go?
Thank you!
Hi Jeremy! Sorry for the long time it took to reply… The overflow is on the right most IBC tank’s top. The others have the input coming in from the top and the 2″
pipes sending the water to the other tanks, but on the last one it’s the overflow. Hope that helps and let me know if you have any further questions.
Hi Sergio, how well will black plastic film hold against sun/UV? I am planning to instal 20 IBC totes on central coast of CA. Have 2 barns (4,000 + 2,000 sf) with metal corrugated roof and large gutters.
Not great, I’m afraid. This was going to have a deck built on top, so it would get minimal sun. For a fully exposed tank. I’d likely paint it. You don’t want any light getting in there or you will get algal blooms.
Related to your project, I’d go with more robust systems for that much water. The IBC tanks are okay, for smaller systems, but you will end up spending a lot of money on adapters and connectors. Instead put that money towards bigger tanks.
Hi. Do you have any experience with burying IBC totes underground? Not sure if it’s possible but would be convenient. It’s only for run off from a greenhouse to help water the garden, not for drinking etc.
thanks!!
I would not recommend this. Several reasons… The plastic is not really meant for this, so it may not last very long, and/or collapse. You will want to anchor the tote, because if not, when the rain hits and you get soil saturation it will very likely pop off the ground “floating”. Since it will take a while to fill, it is essentially a bubble. You may want to just divert the water to trees/shrubs if you can’t store it.
Do you know if totes can be presurised (10 -30 psi).
Hi, I haven’t tried this and would think there would be leaks. But not sure of your use case here. You could get head pressure by lifting your totes. There is a .433psi/foot gained that way. Also applies if you are watering downhill.
Another option is using a transfer pump from the outlet, so the pressure is not in the tank.
Hi I am setting up a rainwater collection system for a tiny house and wondering what you suggest for a filter system to use for flushing and showering
Hi Larry,
Not really sure what to tell you. It depends on your needs and local laws. Also, how you collect the water. I’d say it would be best to reach out to a local expert for this. There are commercial filtering systems, as well as sand filters you could build.
Only 1375 gallons, not 13,750 gallons. 5 totes at 275 gallons is not 13,750. But it is still a good amount of water.
Ha! How did that zero make it there… Thanks for pointing that out. Updated :)
Hello Sergio. We did start a off grid project in Spain that is very isolated, and as we dont have water on the property, we`ve decided to build a rainwater system using IBC totes. We did clean and wash the two fo the IBCs. Will have four in this first stage. We are now wrapping the IBCs “not easy wortk”, and soon will start the plumbing, etc. Thank you from Ricardo, Agnes and Kala.
Hey, great to hear! I would probably spray paint them, if I was doing this again. Because the plastic wrapping will eventually degrade and need to be done again. Also, please make sure you sourced these from a place that used them for something safe to humans.
I’d love to see some photos if you are able to share them.
Best of luck!
Thank you for sharing this and the comments that have followed. I will be using the IBC Totes from a place that sells food grade used totes. I will be collecting water from my gutters for my garden usage. I was wondering if you have a video documenting your work or some video presentaton of your how to or anothers you would suggest? i really appreciate the spray painting update as oppossed to wrapping , thankl you!
Hi William, I don’t have any videos of myself. Usually have my hands full :)
But I would highly recommend Brad Lancaster’s website and books as a fantastic resource:
https://www.harvestingrainwater.com/
One of my biggest takeaways from this system is that it may have been over-engineered in the joinery department. But most of these things are very site/design specific. Best of luck!
I have a two tote system. The way I have the overflow pipe it does not work well, as the totes “balloon” up and shifts the pipes above. Does your friend have issues with your setup? I get a lot of rain storms and have to let out the water through garden hose.
Hi David, the “balloon” effect sounds like a side effect of not having a vent/overflow. There should be some sort of way for the water to escape out the top wall of the totes if they fill up. Pretty sure that’s it. Always keeping in mind where the overflow will go.
Best of luck!
Sergio,
I was given 3 IBC totes. They held OH-2000 polymers. Is there any way to clean them so I can use them for garden and plant watering? If so, how?
Thanks, Shelly